Saturday, October 16, 2010

Cooking with Gas

We recently had an energy audit conducted on the house. The result: our home has heat loss equivalent to a 24 inch diameter hole in the wall. It wasn't really fair that the storm windows are currently off, and we do in fact have holes in the walls, of various sizes. But still, our heating and insulation could be more efficient.

The new storm windows will help, but we really want to get away from so much oil use.

Eventually we may use the gas line to heat a boiler, but until then, we took advantage of a sale Finest Hearth and installed a gas fireplace insert. Now we can heat the downstairs to a cozy temperature without using any oil.


Bonus - it looks a lot better than the old non-functioning fireplace. Bonus #2 - it works in a power outage!

Before:

After:

We're still trying to figure out what to do with the bricks and the tiles below, which are only temporarily placed there.

Tuesday, September 21, 2010

Patented Technology


With a small amount of research, we were able to unearth the patent for our Loxit Sash Balances. Through a home restoration message board I was put in touch with an historic hardware guy who sent me the name of a guy who can replicate the wooden teeth -- he suggests using a reinforced resin to withstand moisture. Not sure how much all this will cost, but its neat to know we could pull it together if we wanted to. Who knew that the Internets could be such a boon for old home restoration?

No More Nerve-Wearing Perturbations

There's a chill in the air these days, which means we need to get our storm windows back on ASAP!

When we re-shingled, we removed an array of mismatched storms. Most were triple-track aluminum, some perhaps original wood, but none in good shape. With our beautiful new casings and shingles, we were hard pressed to have the old mismatched storms re-installed.

For replacements we decided to go with Adams Architectural Millwork, out of Gelana, Illinois. For a long time we had considered some aluminum "historic" storms from Allied, but in the end we knew that only a wooden storm would do the house justice. The ones we ordered will have screens that can pop in place of the glass from the inside, so no climbing on ladders every spring.
Here's an example of the wooden Adams storm:


In the meantime, we've started on the window restoration project. We picked the two front windows, as they are the first thing you see from the street. Recall we also "trued-up" the center bay and right window up front. So this bay has seen its fair share of attention.


We made a cool discovery when the sashes were removed this morning. We've always known our first floor windows had some interesting hardware. There are two buttons on the casing, to the right of each window. The windows are all long-since painted shut, so we didn't know exactly what function the buttons performed.


This hardware is apparently so rare that none of the builders or window restoration people we've had out to the house have recognized it. When the windows came out today, we were able to get a closer look.

We found this mechanism inside - a solid looking cog, and a set of wooden "teeth" along the sides of the sashes.


A closer looks reveals the name "Loxit Sash Balance," a patented product out of Providence Rhode Island.


Of course we googled them and found one or two hits, one from a School Journal published in 1901 (same year the house was built). It seems to cover everything from textbooks to construction. But it did have these interesting notes about our hardware...

The Loxit makes windows open and close easily!:

"No need of sending a boy with a long stick to tug and heave while the other pupils look on with unconcealed amusement."

The Loxit eliminates that annoying rattle!:

"The Loxit also does a good work in preventing windows from rattling. The sash is held so firmly in its place, that, no matter if it has undergone shrinkage it cannot get started on a course of nerve-wearing perturbations."

I am ALL FOR elimination of nerve-wearing perturbations. If only they made one that applied to 4, 3 and 1 year olds.

Wednesday, September 1, 2010

Think Like a Raindrop


I think it was our Realtor who said "a home's worst enemy is water." He said to "think like a raindrop" when assessing certain structural elements of a home where wood meets rain, snow or wind...

When you think about it, this entire Project is about protecting our home from water, or the elements. A new covering of Typar, new shingles, and eventually some window restoration and new storms.


The new bulkhead solved a major water issue in the back, but the real issue is water coming off the roof and sitting against the foundation. With our unique "kicked eaves" roof line, we cannot install a gutter without destroying the aesthetics of the house. So water basically pours off the roof, pounds the earth below, eroding the dirt and then seeping back into the basement through the foundation.

The worst of the problem was along the front of the house where the grade level was actually lower than the middle of our lawn. The house was sitting in a hole, effectively.

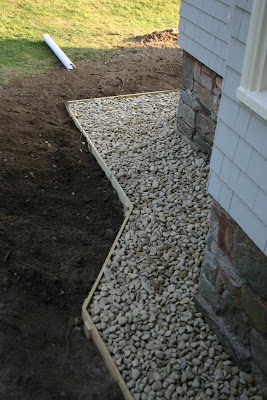
So now we've addressed this issue with a serious drip edge. We've installed about two feet of stone, with a drain pipe buried in it, which will divert water away from the foundation and into the yard.

Here is the drip edge in progress. We're very happy with the results, and we'll know how it works when Earl hits this weekend.

Some close ups of the drip edge.

Of course the beds will eventually have plantings, and you won't be able to see the drip edge, but we'll know its there, quietly protecting the house from the evils of water.


Here's a shot of the front steps newly stained, and now nicely meeting the new grade of the front walk. You can see our current mailbox solution. It's an improvement over the mailman wedging our mail between the screen and the glass on the back door.

Now we're just waiting on the front door, the final shingles around it, the mailbox, the doorbell... Should be done in time for Christmas!
Welcome home!

Tuesday, August 31, 2010

Photo Update


We're finally getting to the re-grading required to make our front stairs "work" with the landscape. No more 12 inch drop on the last riser! We're also putting in a drip edge to divert water away from the foundation.

Thursday, August 19, 2010

ShamWOW!


I have to admit, this is one very exciting milestone! Welcome to the 21st Century old Kicked Eaves! Ok, well maybe just the 20th Century, but we'll take it!

Wednesday, August 18, 2010

A New Bulkhead, Yahoo! (sarcasm)

Our new bulkhead door finally arrived. This is one of the less-fun, required improvements. The old dog-house was really a mess, and a stream of water literally flowed through to our basement every time it rained. So while this will not improve our enjoyment of the house, it will certainly decrease the headache factor.

Recall the old dog-house style bulkhead:


The current situation is shown below. They had to pour a small concrete base at the top of the old stairs down to the basement. It is a non-standard size opening (of course!) so the new steel bulkhead door had to be custom made, and it will now sit on top of the concrete base. The alternative was ripping out the old stairs entirely and pouring an all new foundation down there. The custom door/small concrete cap was the less expensive option.

Note the small deck is now removed from the sliding doors. Long-term we plan to reconfigure this back corner so the exit is in the rear of the house. In the meantime, we'll just place that old rotten set of stairs up against the house. I'm sure it will look great. ;)

Here's the new bulkhead, on its side. It's primed in red paint now, but will be painted to match the shingles.


Like I said, not really fun stuff, but necessary. And also fantastic for insulation and security.

Thursday, August 12, 2010

Columns!

Our columns arrived yesterday! The builder came out first thing this morning to install. Behold:
Of course this is more fun with a before shot:


Pretty dramatic, right?

We're still waiting on our front door, overhead lantern, and a little landscaping... and our exterior makeover will be complete! Well, at least as far as the porch is concerned.

Friday, July 30, 2010

Approaching Completion, Phase I

About time for some more progress photos. The shingles are 99% done, the trim is 90% done. We're just waiting on our columns, the new bulkhead door, and the front door, before the final touches can be made.

Here are some before and after shots. Notice there are no more wires coming to the front corner of the house! This may not look like much in the photo, but in real life it really opens up the front yard, and cleans up the feel of that front corner.

We have some decisions to make regarding the windows. We found another restoration guy who can do it for less. When we started really thinking about restoring all the old windows - the numbers started to get pretty painful. For the cost to restore one old window, you could almost buy two nice new windows. And with new windows you would not need storms.


In the end we decided that yes we do still want to restore. We're going to start with the front two on either side of the large bay window. In the meantime we need to get storms back up on the other windows. While its unusually hot here in Maine, winter will be here soon enough and the wind blows straight through these old windows.

Once we finish these open items, the exterior of the house will pretty much be done. I guess we can call this Phase I. Phase II and III being the interior and adding space.... both of which are still TBD.

Thursday, July 15, 2010

When is a Door not a Door?


When it is a fine piece of modern craftsmanship that creates a water and air-tight, secure barrier between you and the world. And when it replaces a dilapidated, poorly built, drafty, 50 cent locks from Ace Hardware thing that barely kept out the mice.

Behold, our new cellar door. This is the door at the base of the bulkhead (see below). It may not look like much, but this puppy will pay for itself in one winter given the breeze and sunshine you could feel through the old one.

Unfortunately I did not take a good "before" shot of the old one, so here it is, lying in the dumpster in our front yard. Buh-Bye Old Door!

Tuesday, July 13, 2010

Is that your FINAL answer?


You have to be decisive and have a strong gut when you're renovating your home. You make a decision one day, and the next day it's implemented in the form of labor and materials. If you change your mind, it's either going to cost you, or you just have to live with your "mistake."

I've spent many a late night fretting over catching the builder first thing in the morning to share a revised detail -- before a truckload of bead board is purchased or the wrong paint color is mixed.

So we decided to go with "option c" for the soffit. We are applying new bead board to the existing soffit thereby encasing any lead paint AND improving the appearance.

Today when we stepped out to see the progress for the day, we saw bead board already applied to 1/3 of the soffit area. Luckily, we really like the result.

The painter will be here this week. Hopefully we picked the right color!

We ordered four new windows for the breakfast room about 2 weeks ago. Fortunately for us, Eagle takes 2 weeks just to process the order, and we only received a call to verify colors today. Turns out we DO want to change the order. This is one instance where slow processing works to our benefit.

We picked a front door design, and now we understand the process will be iterative. This brings great calm to the indecisive soul. The door manufacturer will create a design sketch and send it to us. We then get to "tweak" it if anything looks off. Basically we want something like the photo below, which is a historic door from our neighborhood. At the rate windows and doors are shipped, it may be winter before we see ours, but at least we know it will be exactly what we want.

Thursday, July 8, 2010

White is not White

Until you analyze a home inch by inch, you don't really think about all the details that go into your overall impression. You just drive by and think "that place is a dump" or "that looks cozy." But what exactly is it that makes a dump a Dump?

In the case of our Dump, there are many elements. The most noticeable problem for our house -- in our opinion -- was the shingles. They looked like a set of bad teeth. Fine from far away, but if you come close and get a big smile... it was unmistakably dilapidated.

And its not until you start fixing certain elements that you notice others that are less obvious (because you're distracted by the crooked teeth). For example - grossly crooked shingles will distract you from the chipped paint on the trim. So replace the shingles, fix the trim. Then you notice the soffit needs a little help.

So we've come to the soffit and our options are: a) paint them, including careful handling of existing lead paint; b) tear them off - including careful handling of lead painted boards; or c) place new bead board soffit on top of the existing boards thus encasing any lead painted surfaces.

The easiest (and cheapest) option is c.

We think, we hope, that this is the last bit we need to fix to completely eliminate all obvious elements of dumpiness from the place (at least from the exterior!).

Here's a photo of the same gable from the previous post - now newly shingled! It looks great! And I was going to point out on this photo how the soffit now looks crumbly in comparison, but you know what? In this photo you can't really tell. The builder was going on and on today about the 20 foot rule: from 20 feet away you can make anything look good with a new coat of paint. Maybe he's right.

In other riveting news, we picked one of the trim colors. Our basic scheme is Seacoast Gray Shingle, white trim, black accents. Of course "white" is any one of five hundred billion color options. We narrowed this down to 5 soft whites from Sherwin Williams, and finally decided on "Classical White" -- which, if you care, is a white with Raw Umber and Deep Gold mixed in. It is a nice warm white with brown and yellow undertones. In contrast we could have gone with a colder white with no yellow mixed in (see Sherwin Williams "Pure White" which is white with only Raw Umber mixed).


Photos on the Internet are never accurate when it comes to color, but this shows two of our choices (Downy on the left, Classical White on the right). Compare both of them to the white trim already in place - that is just a cold plain white primer coat on the wood. The Classical White will register "white" to a passer by, but in their heart they will think "my, that house looks so cozy and inviting!" Well at least that's what we hope.

Tuesday, July 6, 2010

A New First Impression


The shingling is coming along very nicely. It's amazing what some nice, even, smooth shingles can do for an old home. Even without new paint, the old windows look better, and if you don't look too closely the whole place really looks brand new.

The third photo shows a high gable where the last of the original shingles remain - quite rough in comparison.

I see now how the exterior of a home can really impact a buyer's interest in a home; the first impression is everything. But the thing is, we're not new buyers -- we've been living here for almost 2 years. So while the exterior now looks like a million bucks, we're not fooled. We know what the basement looks like. We know about that painted-over-wallpaper.

It does look great though. We can't say it doesn't make us happy to see the old place spiffed up.

That being said, we're ready for the builders to leave. It's sort of like a good date that has gone on just a wee bit too long.

At first everyone was giddy and smiling. A veritable love fest. Then the bill arrived and things went south fast. In all seriousness, it just gets old having guys working outside your windows all day long -- especially when you work from home. The debris on the lawn keeps the kids inside, the driveway is full of supplies. So, as much as we love these guys, we'll be happy when they go.

I guess this is a good lesson, and we will think very seriously before we embark on any further projects.

Thursday, July 1, 2010

Progress Photos


Here are a few shots of this week's progress. You can see the exterior of the now-straight bay window up front. There are two other windows that could use straightening, but we're now asking ourselves: how much is a straight line worth?

The answer: probably not at much as it costs.


Monday, June 28, 2010

If You Give a Mouse a Cookie

If you have kids you've probably read the children's book series "If You Give a Mouse a Cookie." Renovating an old house is much like that series. Basically, if you give a mouse a cookie, he's going to want a glass of milk, and if you give him milk he's going to ask for a straw... and so on.

So if you re-shingle a 110 year old home, when the builder gets to a crooked window sill he's going to ask you if you want to straighten it. If you straighten a crooked window, you're going to have to replace the interior trim. If you replace the interior trim you're going to damage the plaster, and so on.

Having lasted 110 years, our home is actually still quite straight and solid. There are one or two locations however where the house clearly settled and it is most obvious when you look at the windows. Four of the windows have been manipulated over the years so that the window sash appears level, while the window opening itself has gone 1-2 inches off kilter. The technical term for this effect is called, "the hot mess."

Two of these off-kilter windows happen to be right at the front entry. We decided to let the builder "true-up" the opening on these two, then we would see how it looks and decide if its worth it to do the other two.

To complicate matters, we know there's lead paint involved. We've got 3 kids age 4 down to 8 months* so this is a big issue for us. We're happy to get rid of any lead based interior trim - but the removal itself is also tricky.

We had to clear all furniture out of the room in question, and when the builders arrived this morning they went in there and sealed themselves off with plastic sheeting. Lots of banging and sawing later we're left with this lovely interior.


The builder will now cut a new knife with our trim pieces and return in a day or two with brand new trim that matches the original exactly.


Note the hole in the wall between the two windows. We knew this was a possibility. To add yet another layer of complication to things, the walls you see here are actually wallpapered plaster, painted over by us in the lovely Benjamin Moore Yosemite Sand.

So now we wonder - do we just patch that spot, or is now the time to rip all the wallpaper down, and re-surface this room?
Like I said, if you re-shingle a 110 year old home...


*if you were not already questioning our sanity, you know for certain now that we are clearly not in our right minds due to years of sleep deprivation!


Friday, June 25, 2010

Thursday, June 24, 2010

New Casings are Here!


Our builder has made more than a reasonable effort to convince us to replace our windows, and I have to say he's almost broken us once or twice. But we remain resolute.

Today the builder installed some of our new casings. This is the outer most trim that goes around the top and sides of the window. The sill is the bottom piece, and unless you pull the entire window out of the wall, you cannot replace the sill.

The builder had a knife cut to match our existing trim, and then cut new casing trim to apply to the windows. The new casing is approximately 1/4 inch thicker than the old casing. This is required so that the shingles and the "cedar breather" behind them do not rise up above the dimension of the casing. That would make the windows look buried in shingles.


Anyway, the photo here shows our stained glass window with the new casing applied. Just inside the new casing you can see some chipped and ragged looking trim. I believe that is the jam? similar to the sill it cannot be replaced without removing the entire window. It looks bad in this photo, but in person you can tell that with a coat of paint the overall trim will look brand new.

We do plan to remove 2 or 3 windows that are severely askew to straighten them out. It turns out the house is not crooked, just these few window openings appear to be crooked. Perhaps they settled that way? We have to clear out the living room for several days while they do that, but that's a post for another day.

Wednesday, June 23, 2010

Monday, June 21, 2010

Perspective

Let's check out some side-by-side before and after shots to see just how far we've come with the porch.


Its easy to lose sight of how things used to look. Now I see lots of nice straight lines, smooth shingles. No matter how much we sweat the details it's going to look great when it's done!

Friday, June 18, 2010

Pretty Shingles!


More progress photos. Lattice work installed in the porch base. This is for ventilation under the porch, and its also a nice detail to break up the continuous shingles.


And yes, those are new shingles!


While this makes us inordinately happy to see, our celebration is also mixed with some frustration.


When you look at the porch you probably see wood, shingles, some stairs. Not much to it, right?


Well we see those things, but we also see a rise over run that is steeper than we requested, a lattice box that is mysteriously off center, and trim detail that does not quite look like what we had in mind. And why doesn't the lattice box look exactly like the photo we used as a reference?


In these small, teeny-tiny, seemingly innocent details, we've learned many many lessons.


Back when we were planning a more elaborate addition the architects offered project management services. They would come on site and monitor progress and give guidance to the builders. While this wouldn't make sense for a project this small, we've learned now how valuable those services can be.


Without detailed written specs, informal conversations happen. Decisions are made on the fly. Miscommunications happen and next thing you know you've got a 7 3/4 inch stair rise and someone had their heart set on a 6 inch rise and the stairs might need to be torn off and rebuilt and nobody's happy about that.


So while we're delighted to see some shingles thrown up, there's a fair amount of sweat and frustration thrown in behind them that no one would notice besides me and Chris (and of course the skilled craftsman who actually did install them). ::sigh::

But don't the shingles look pretty?